const { buildModule } = require("@nomicfoundation/hardhat-ignition/modules");

const Vesting = buildModule("VestingModule", m => {
	console.log("Deploying VestingModule contract");

	const deployer = m.getAccount(); // Get the deployer of the contract, is defined in ENV
	const token = "0x9ab28d7fc04a1af08b18ec08f51fac37a313cf19";
	const vesting = m.contract("Vesting", [deployer, token]);

	return { vesting };
});

module.exports = Vesting;
The ignition uses your private key (defined in your ENV) to know the deployer. To register your private key with hardhat, the CLI command works.
npx hardhat vars set PRIVATE_KEY "INSERT_PRIVATE_KEY"
Once the setup requirements above are met, we can then deploy our code to any environment of our choice, we will deploy to passetHub (a Polkadot smart contract environment). Configure hardhat.config.js
We setup a frontend environment to interact with the smart contract using NextJS, Polkadot API (PAPI). Any Typescript environment can be used in the same manner that we do here. To start with, the following are the lists of helper libraries to make the interaction with our smart contract possible.
Polkadot API - Typescript API to interact with Substrate-chains.
Viem - A Typescript interface for EVM-chains
talismn/connect-wallets - for accessing device-available list of (Substrate-compatible) wallets
Create-dot-app - a NextJS template for building frontend dapps. This comes installed with some of the packages we need, so we only need to install the missing ones. Run the command below in your terminal and follow the prompts.
npx create-dot-app@latest

&&
# install after setting up the template
# cd <dot-app-template> to install
npm install viem
Now that we have the libraries and template all set up, we can then proceed to interact with our smart contract. The first thing we want to do is to select a wallet (and thereby an account). Create dot app comes already installed with a package that helps us do just that, talismn/connect-wallets__, and this is what we will use.
Connecting a Wallet
To connect a wallet, we need to get a list of all installed wallets on the browsing device. The code excerpt below does just this for us.
import { getWallets } from "@talismn/connect-wallets";   // returns a list of all Substrate wallets

// we can define a function to return the wallets we need
// each wallet is of type Wallet
const getWallets = () => {
	const wallets = getWallets();
	const installedWallets = wallets.filter((wallet) => wallet.installed);
}

// Connect to any selected wallet
async function connect(wallet: Wallet) {
	try {
		setIsConnecting(wallet.extensionName);
		await wallet.enable("DAPP_NAME"); // DAP_NAME should be unique per dapp

		// get all acounts on the enabled wallet
		const accounts = await wallet.getAccounts();

		// store the accounts to state
		setAccountsList(accounts);
		// connect the first wallet by default
		setSelectedAccount(accounts[0]);
	} catch (err) {
		setSelectedAccount(undefined);
		setAccountsList([])
	} finally {
		setIsConnecting(false);
	}
}

function selectAccount(account: WalletAccount) {
	setSelectedAccount(account);
}
Once we have our wallet of choice connected through the approach above, we can then use this wallet to interact with our contract and also fetch information about the connected wallet. We can, for instance, write to the deployed contract. Some further optimizations for this wallet connection is to persist the connected wallet and account on the User’s device (maybe local/session storage), so they don’t have to always do the wallet connection when they refresh their app.
💡 N.B. If you setup using create-dot-app, this wallet connection logic is already implemented in this approach and you can read it to get familiar
Writing to the smart contract
The deployed smart contract has a write function to add a beneficiary and we will be calling that. The function signature is defined below
To call this function from our frontend, we need to do a couple of things.
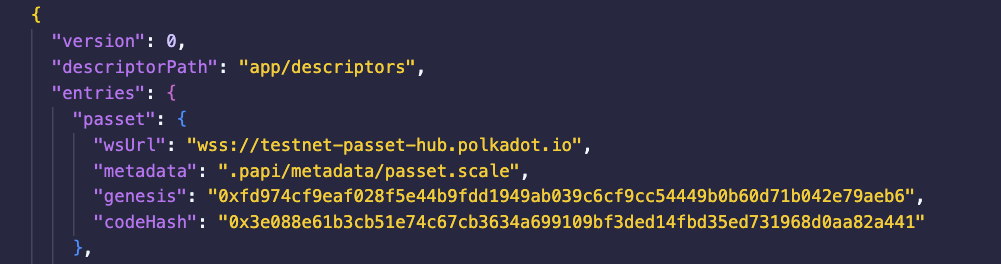
Ensure the API for passetHub (or the chain you’ve deployed on) is registered on the D’app. This can be confirmed by checking the PAPI config located inside the /.papi/polkadot-api.json if you can see your chain there, then this step is covered. You should see a config like below inside the “entries”.
If you don’t have the chain configured already, you can run the command below to set it up
Register the smart contract with Polkadot API. This is done to allow typed interactions (this is an optional step). To do that, we use the command below
pnpm papi sol add ./deployments/Vesting.json vesting
Now we can proceed to addBeneficiary,
import { createClient } from "polkadot-api";
import { passet } from "./descriptors/dist";
import { encodeFunctionData } from "viem";

const addVestingBeneficiary = async () => {
	const client = createClient(getWsProvider("wss://socket-url"));
	const typedApi = client.getTypedApi(passet); // reference to our added chain

	// We need to encode our function data and args for revive-compatibility
	const data = encodeFunctionData({
		abi: VestingContractABI,
		functionName: "addBeneficiary",
		args: [
			SS58toH160(selectedAccount.address), // parse connected SS58 account to H160
			10000n,  // timestamp in BigInt
			10n, // amount in BigInt
		]
	});

	// perform a dryRun to get the gas requirements
	// Also happens much faster so a good way to know if a call succeeds
	const dryResult = await typedApi.apis.ReviveApi.call(
		selectedAccount?.address || '',
		Binary.fromHex("0xD42492524cA1d5C6D5a9ef6b93BB806105B8e86c"),
		BigInt(0),
		undefined,
		undefined,
		Binary.fromHex(data),
	);

	if (dryResult.result.success) {
		const signer = await polkadotSigner(); // gets signer for the connected wallet account

		if (signer) {
			// perform the actual call
			const response = await typedApi.tx.Revive.call({
				dest: Binary.fromHex("0xD42492524cA1d5C6D5a9ef6b93BB806105B8e86c"),
				data: Binary.fromHex(data),
				gas_limit: dryResult.gas_required,
				storage_deposit_limit: dryResult.storage_deposit.value,
				value: BigInt(0),
			}).signAndSubmit(signer);  // sign and submit submits the transaction using the signer

			if (response.ok) {
				console.log('Transaction included in block', response.txHash)
			} else {
				console.log('Transaction failed', response)
			}
		}
	}
 }
What is happening here?
We use the WS client gotten to interact with the pallet-revive (on passetHub) and call the call function on it, which is used to call smart contract functions. Because we are interacting with Solidity contract, we use encodeFunctionDatato encode the data into a type that is compatible with ink’s CODEC types.
Querying a contract works in the same way and the result can be decoded using viem’s decodeFunctionData on the result of call like below.
It’s also possible to deploy our smart contract from our Frontend application. This is not a very common occurrence, but it’s possible and a use-case might be to deploy contract-as-a-service, where users deploy a new contract based on their requirements. The steps are the same as writing to a contract, except that we call instantiate (and not call). After we have compiled our smart contract and generated the sol ABI, we can then proceed to also generate the PolkaVM code byte. This code byte is a representation of our smart contract code and is what gets deployed into pallet-revive (as our contract).
The polkavm byte is automatically generated when we compile our ink! smart contract, but for a Solidity contract, we need an extra step and this extra step can be covered using the @parity/resolc compiler (install from here). The we can use the CLI command below to generate our .polkavm byte.
npx @parity/resolc --bin <path_to_abi.json>
Once we have our .polkavm generated, we can copy it into our frontend codebase and now use it to deploy our contract on the Frontend.
Now we can write a function like below to deploy our contract.
const deployeVestingContract = async () => {
	// encode the constructor arguments
	const deployData = encodeDeployData({
		abi: VestingContractABI, // Our original generated ABI
		args: [SS58toH160(selectedAccount.address)],
		bytecode: "0x", // we don't have to pass this as it will be uploaded during instantiate
	});

	// fetch the copied codeblob, a simple fetch request will work
	const pvmBytes = Binary.fromBytes(generatedPVMBuffer);

	// Instantiate with code, does the actual deployment
	const signer = await polkadotSigner();
	if (signer) {
		const result = await typedApi.tx.Revive.instantiate_with_code({
			value: BigInt(0), // no transferred value on deployment (pass if constructor is payable)
			code: pvmBytes, // this is where we pass the polkavm bytes
			data: Binary.fromHex(deployData),
			gas_limit: BigInt(100000000), // pass a very large value (if you're rich)
			storage_deposit_limit: BigInt(10000000), // also pass a large value if rich
			salt: undefined
		}).signAndSubmit(signer);

		if (result.ok) {
			decodeDeployData({
				abi: VestingContractABI,
				data: deployData,
				bytes: "0x"
			})
		}
	}
}
This approach ensures that the data field we need for the construtor is always ABI-encoded and then the actual interaction to revive is SCALE-encoded.
Final Remarks
Polkadot wallets allow interacting with Solidity smart contracts deployed on the pallet-revive (of a Substrate chain) and there’s not much differences in the approaches.
Compile your code and generate the ABI,
Generate the polkaVM blob (used in the revive.call). This can be done using the command below
npx @parity/resolc --bin <path_to_abi.json>
The output is the .polkavm code blob
Import ABI and polkavm blob into Frontend codebase
Generate necessary types (for the chain and the contract(s))
Interact with contracts as desired
This approach will be made more simplified in the future (but for now PAPI and the Polkadot wallet are made to interact seamlessly with ink! contracts), but this approach is as low-level as it gets because we have to interact with the pallet-revive directly. But in the future, this step can be abstracted away.
For further reference, you can follow this codebase as it has many of the logic explained here already implemented.